

 Set up docs MCP
You can use ClickPipes to ingest data from your source Postgres database into ClickHouse Cloud. The source Postgres database can be hosted on-premises or in the cloud including Amazon RDS, Google Cloud SQL, Azure Database for Postgres, Supabase and others.
Postgres ClickPipes can be deployed and managed manually using the ClickPipes UI, as well as programmatically using OpenAPI and Terraform.
Prerequisites
To get started, you first need to make sure that your Postgres database is set up correctly. Depending on your source Postgres instance, you may follow any of the following guides:
-
Generic Postgres Source, if you’re using any other Postgres provider or using a self-hosted instance.
-
TimescaleDB, if you’re using the TimescaleDB extension on a managed service or self-hosted instance.
Once your source Postgres database is set up, you can continue creating your ClickPipe.
Creating your ClickPipe
Make sure you’re logged in to your ClickHouse Cloud account. If you don’t have an account yet, you can sign up here.
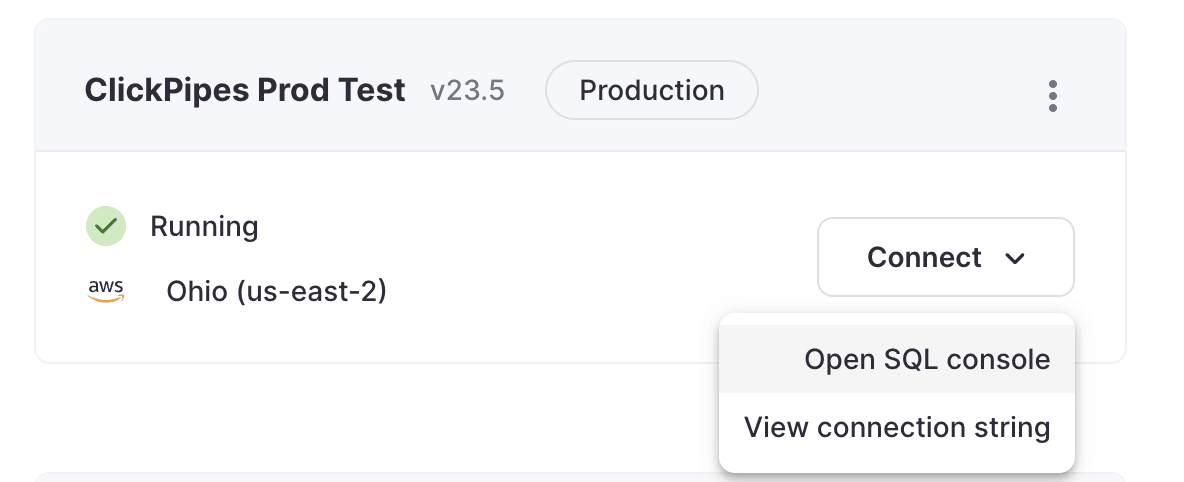
- In the ClickHouse Cloud console, navigate to your ClickHouse Cloud Service.
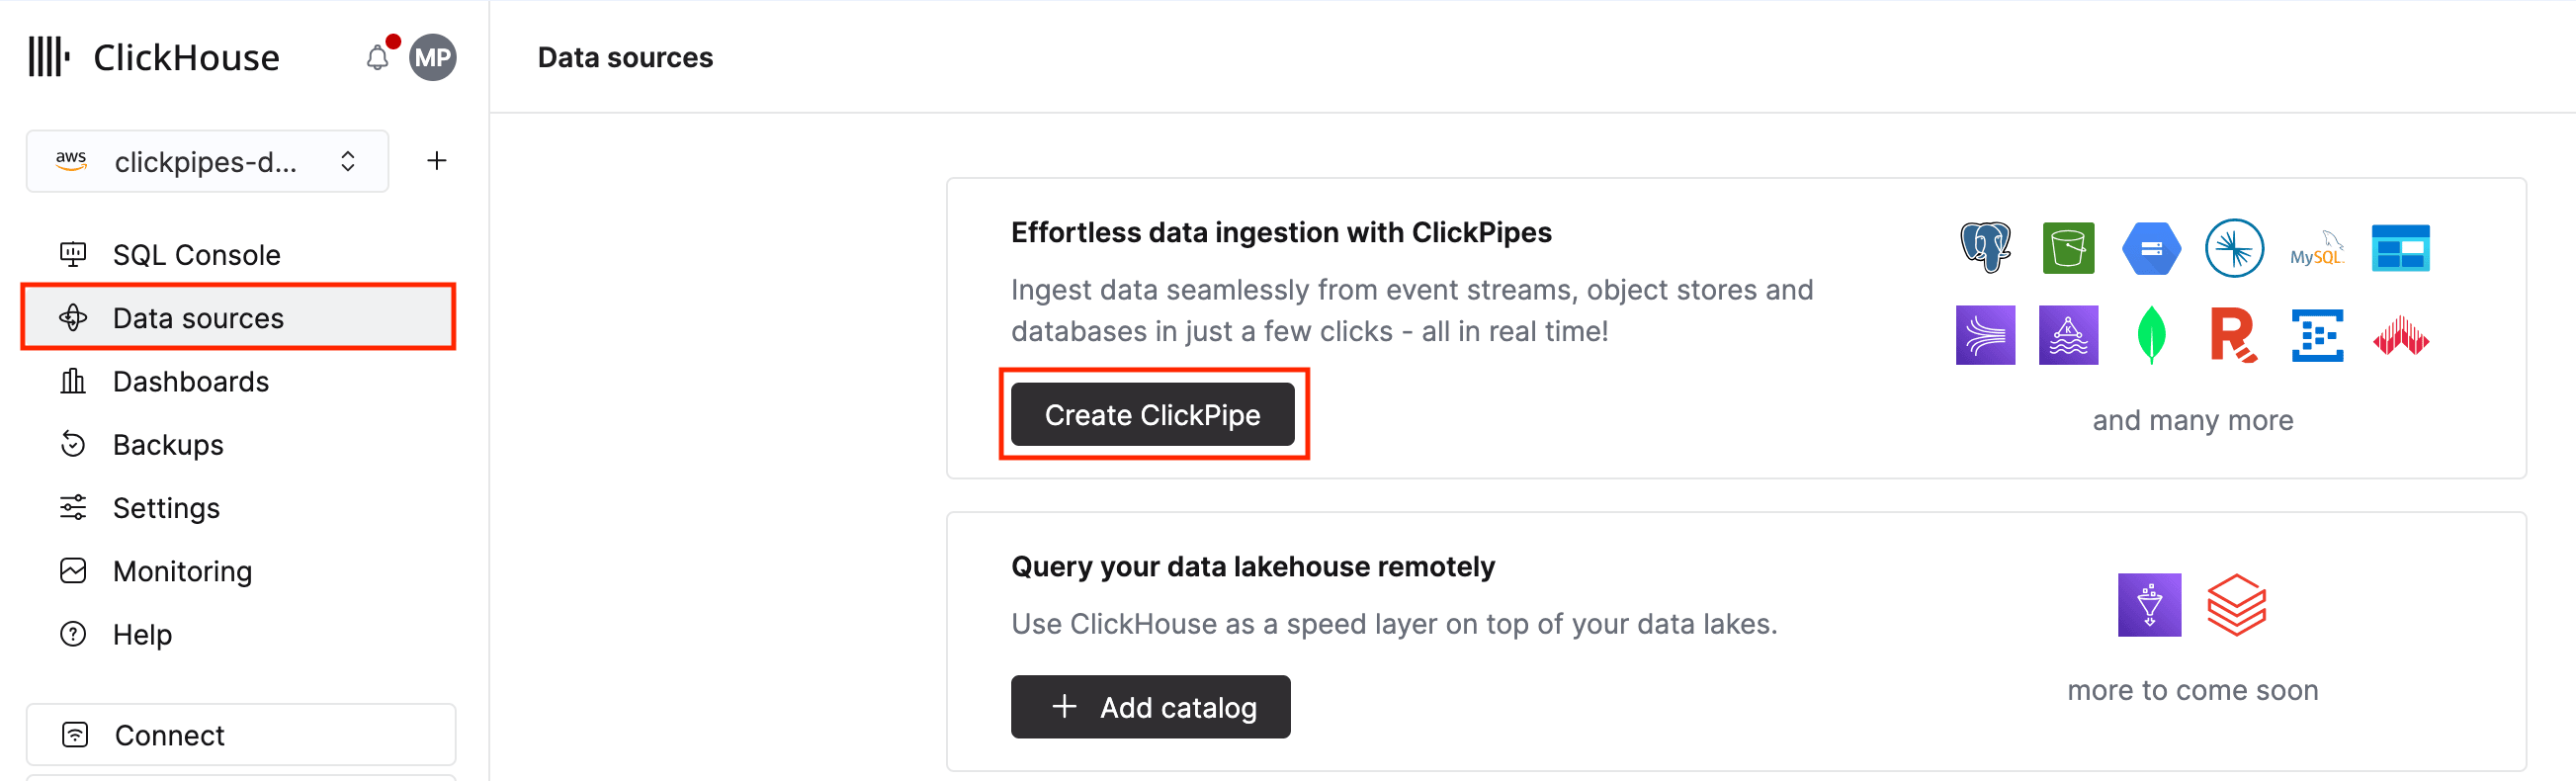
- Select the
Data Sourcesbutton on the left-side menu and click on “Set up a ClickPipe”
-
Select the
Postgres CDCtile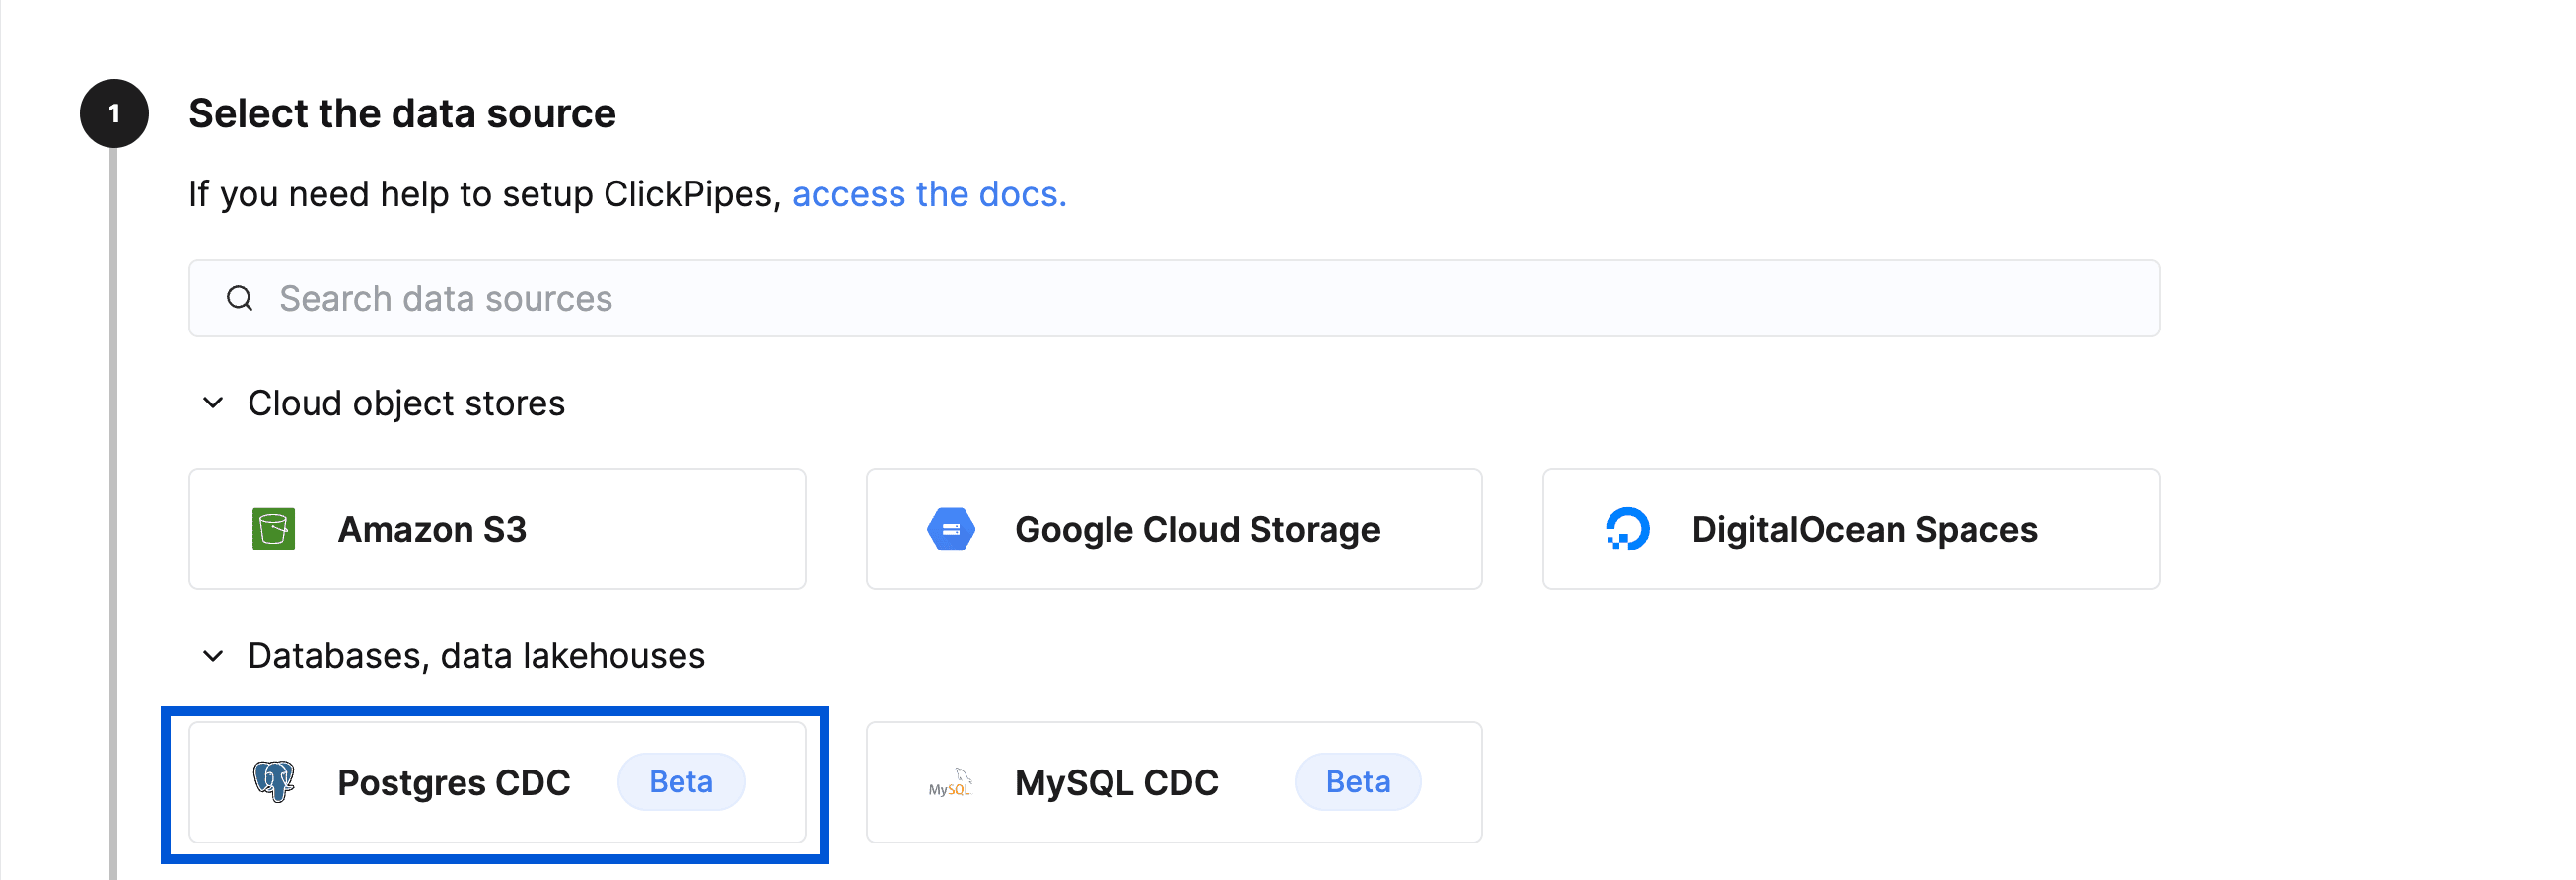
Adding your source Postgres database connection
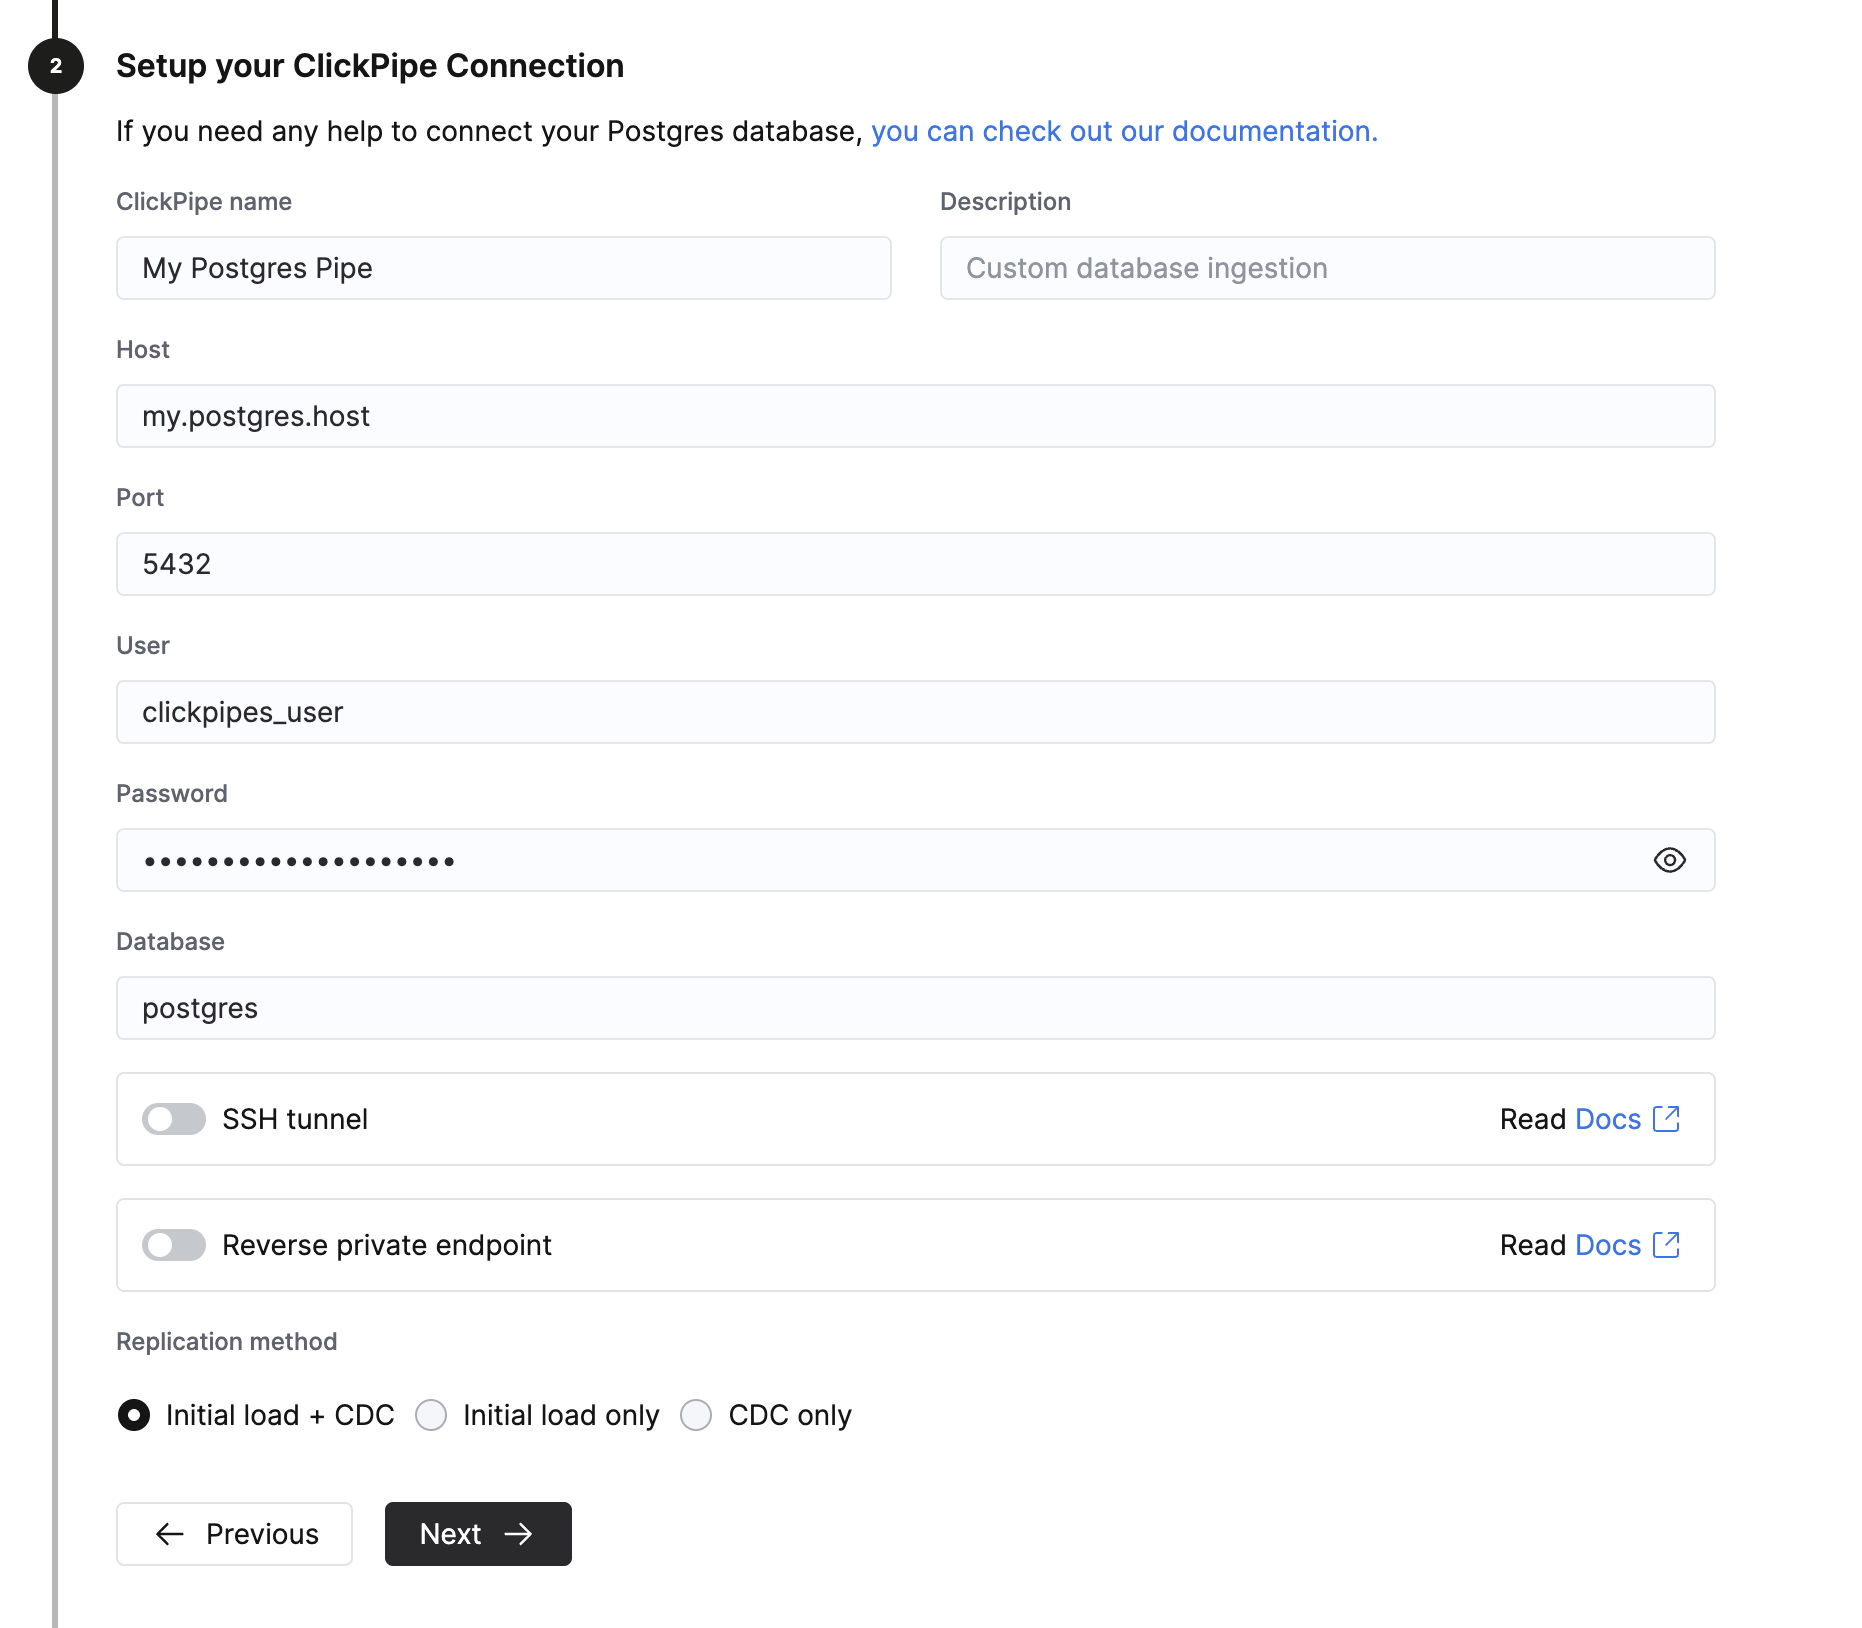
- Fill in the connection details for your source Postgres database which you configured in the prerequisites step.
(Optional) Setting up AWS Private Link
You can use AWS Private Link to connect to your source Postgres database if it is hosted on AWS. This is useful if you want to keep your data transfer private. You can follow the setup guide to set up the connection.
(Optional) Changing TLS settings
By default, your ClickPipe will be created with TLS enabled and certificate verification. These defaults can be modified upon ClickPipe creation:
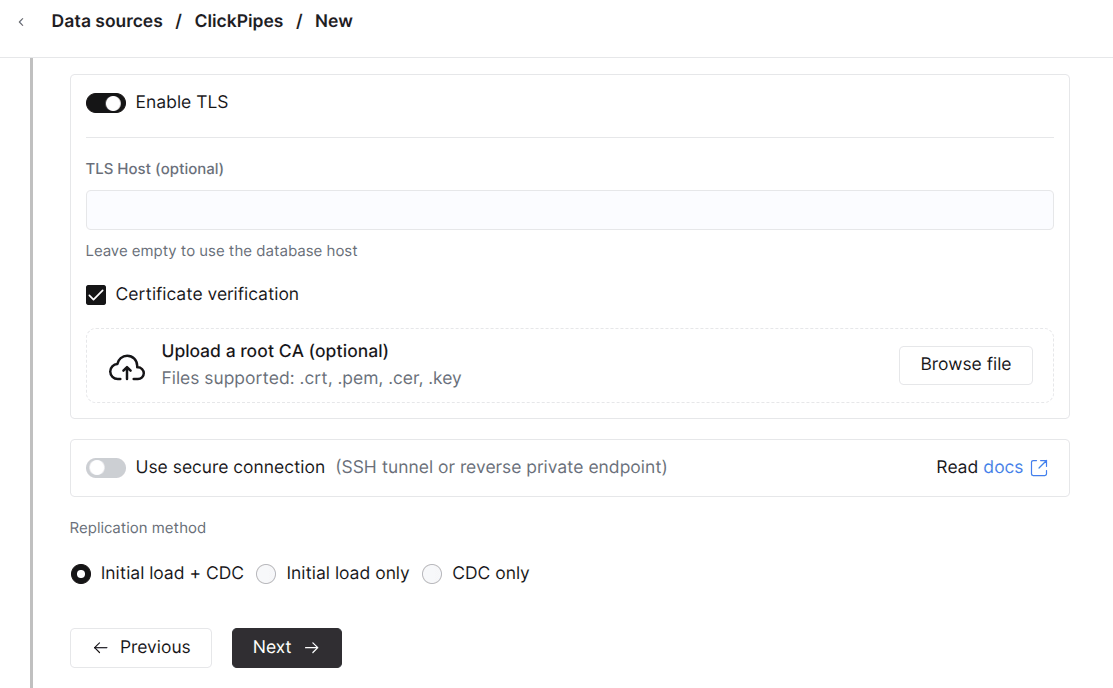
Or edited at the Connection settings section of your paused ClickPipe Settings tab:
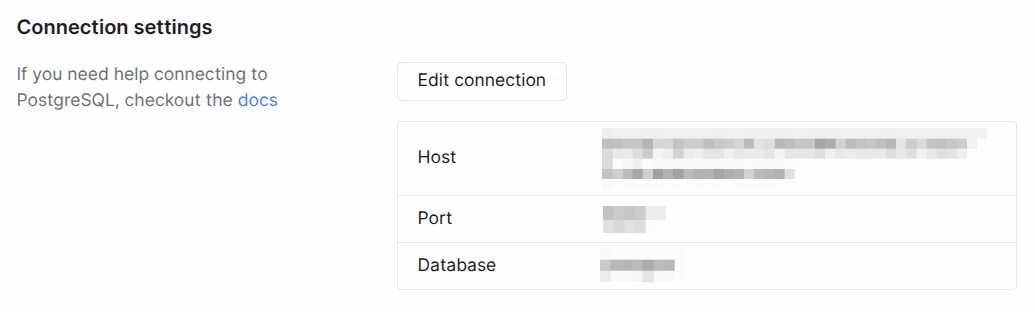
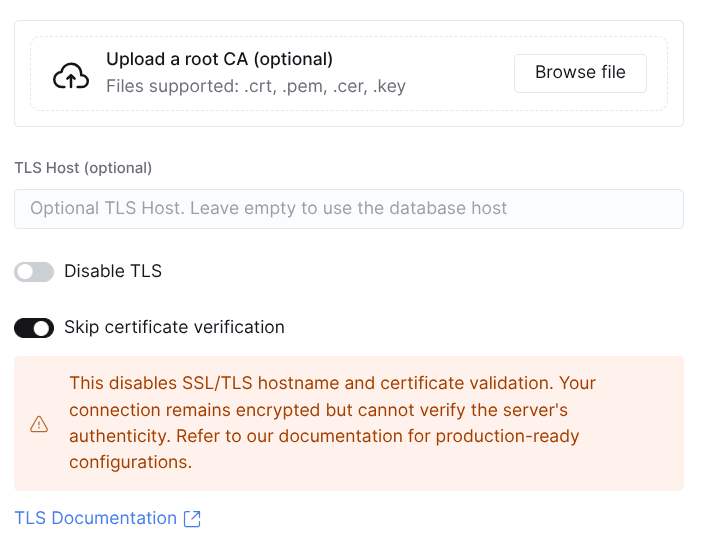
Where:
Disable TLStoggles TLS for the connection on or off. Turning TLS off means data is sent as plaintext over the network, potentially including secrets and sensitive data.Skip certificate verificationtoggles on or off the verification of the certificate presented by the source database. Take into consideration the security implications of skipping certificate verification.TLS Host(optional, defaults to the source Host) is the hostname the certificate’s CN must match when certificate verification is enabled.Upload CAcan be used to provide a CA used when certificate verification is enabled.
(Optional) Setting up SSH tunneling
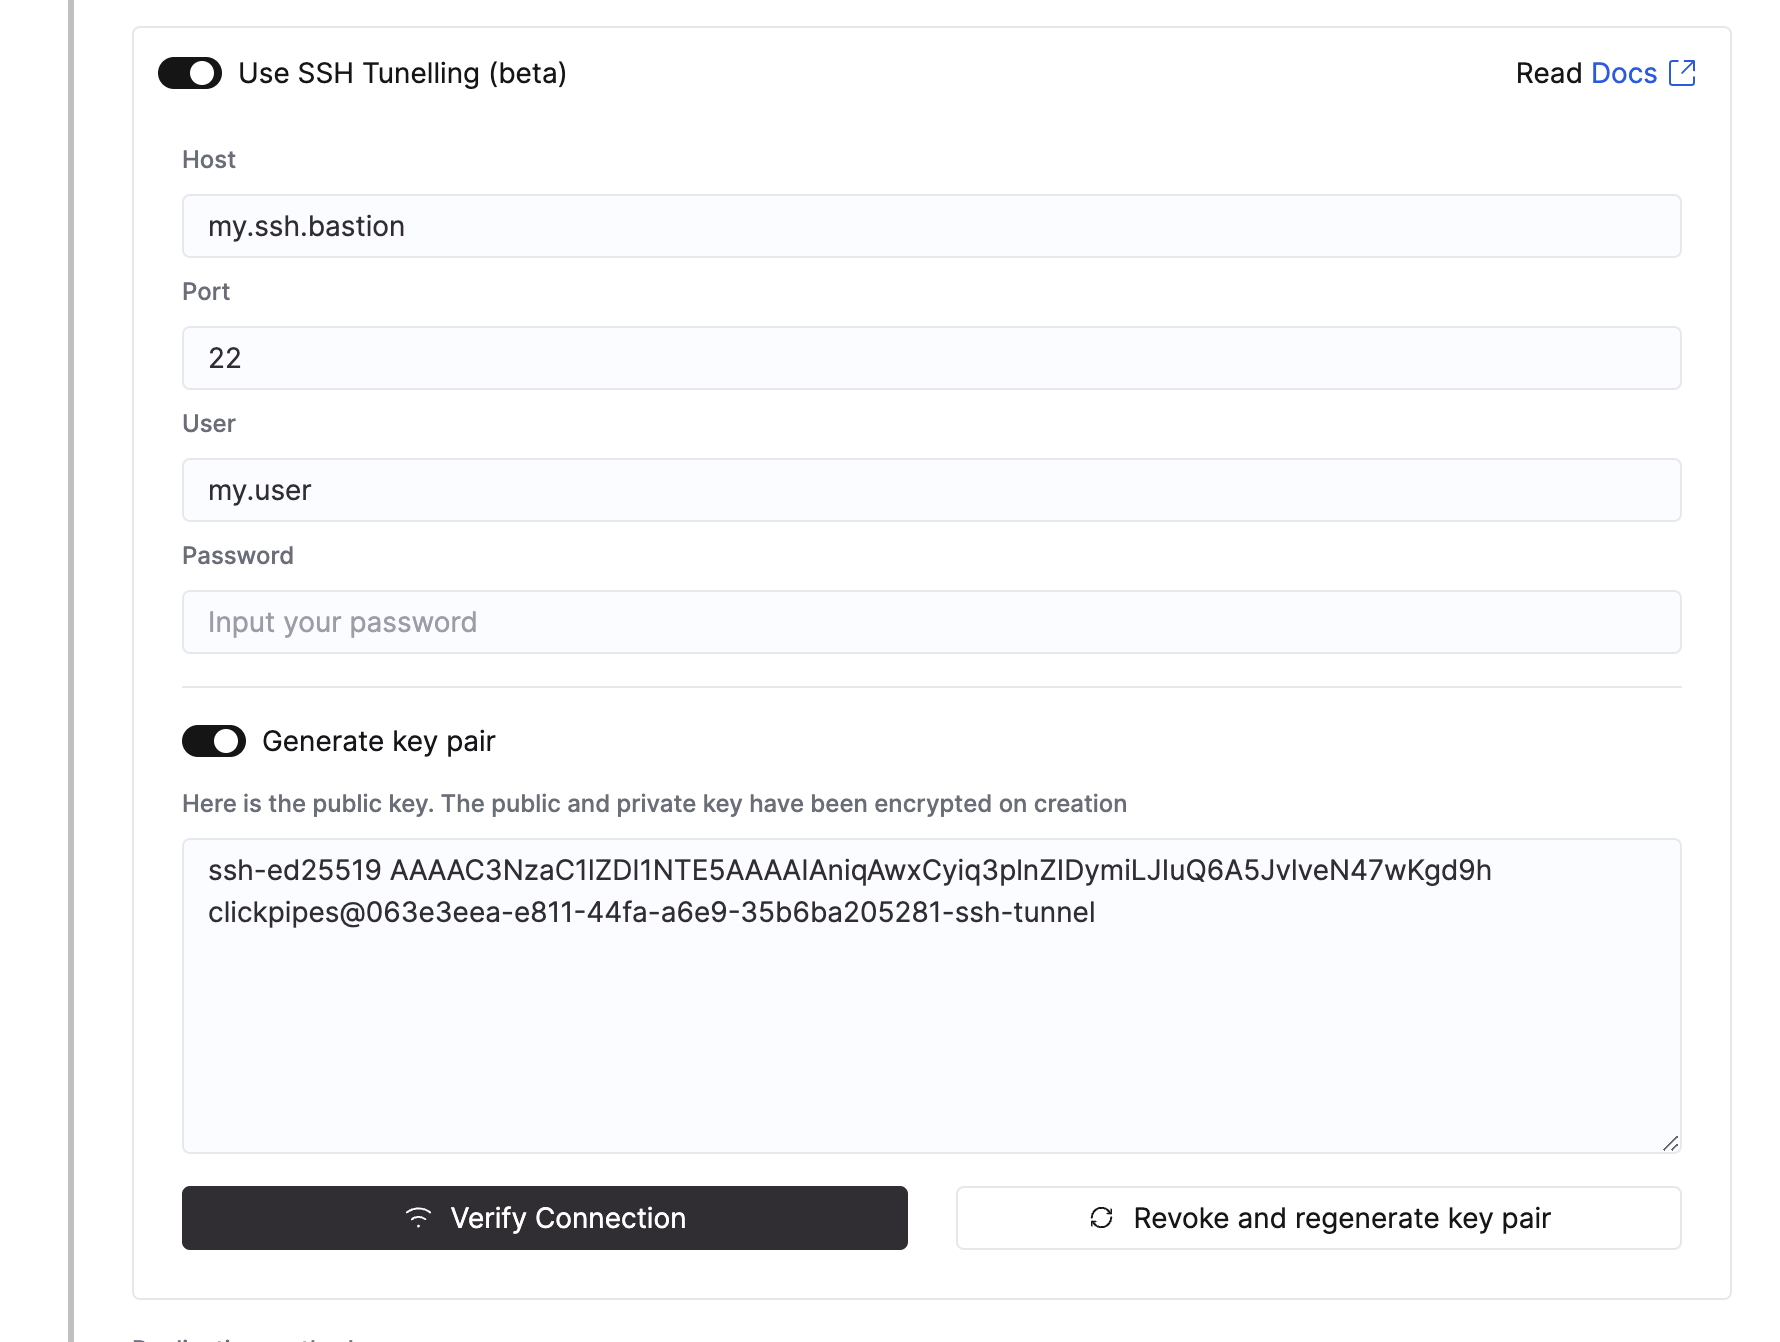
You can specify SSH tunneling details if your source Postgres database isn’t publicly accessible.
-
Enable the “Use SSH Tunnelling” toggle.
-
Fill in the SSH connection details.
-
To use Key-based authentication, click on “Revoke and generate key pair” to generate a new key pair and copy the generated public key to your SSH server under
~/.ssh/authorized_keys. -
Click on “Verify Connection” to verify the connection.
Once the connection details are filled in, click on “Next”.
Configuring the replication settings
-
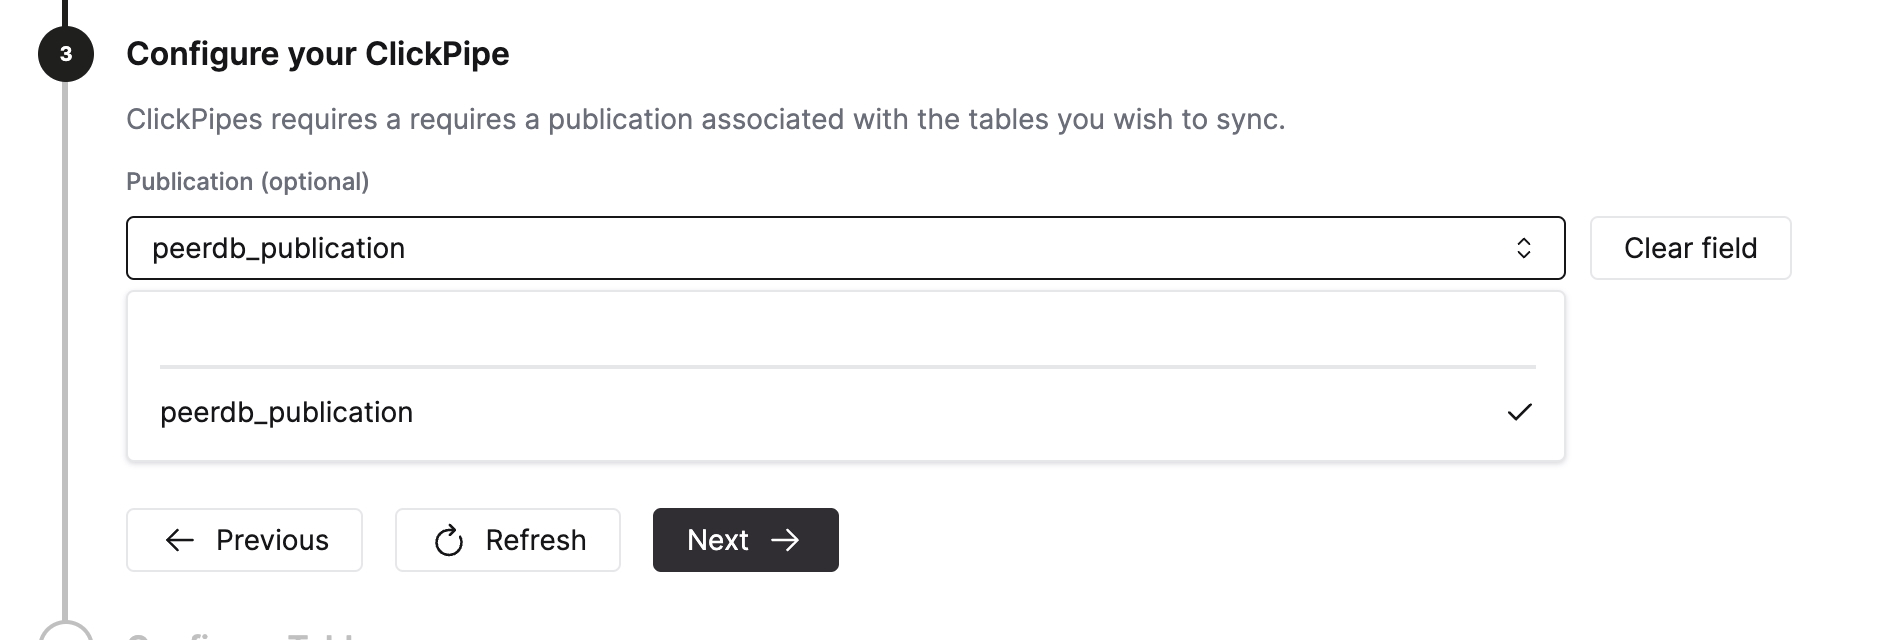
Make sure to select the replication slot from the dropdown list you created in the prerequisites step.
Advanced settings
You can configure the Advanced settings if needed. A brief description of each setting is provided below:
- Sync interval: This is the interval at which ClickPipes will poll the source database for changes. This has implication on the destination ClickHouse service, for cost-sensitive users we recommend to keep this at a higher value (over
3600). - Parallel threads for initial load: This is the number of parallel workers that will be used to fetch the initial snapshot. This is useful when you have a large number of tables and you want to control the number of parallel workers used to fetch the initial snapshot. This setting is per-table.
- Pull batch size: The number of rows to fetch in a single batch. This is a best effort setting and may not be respected in all cases.
- Snapshot number of rows per partition: This is the number of rows that will be fetched in each partition during the initial snapshot. This is useful when you have a large number of rows in your tables and you want to control the number of rows fetched in each partition.
- Snapshot number of tables in parallel: This is the number of tables that will be fetched in parallel during the initial snapshot. This is useful when you have a large number of tables and you want to control the number of tables fetched in parallel.
Configuring the tables
-
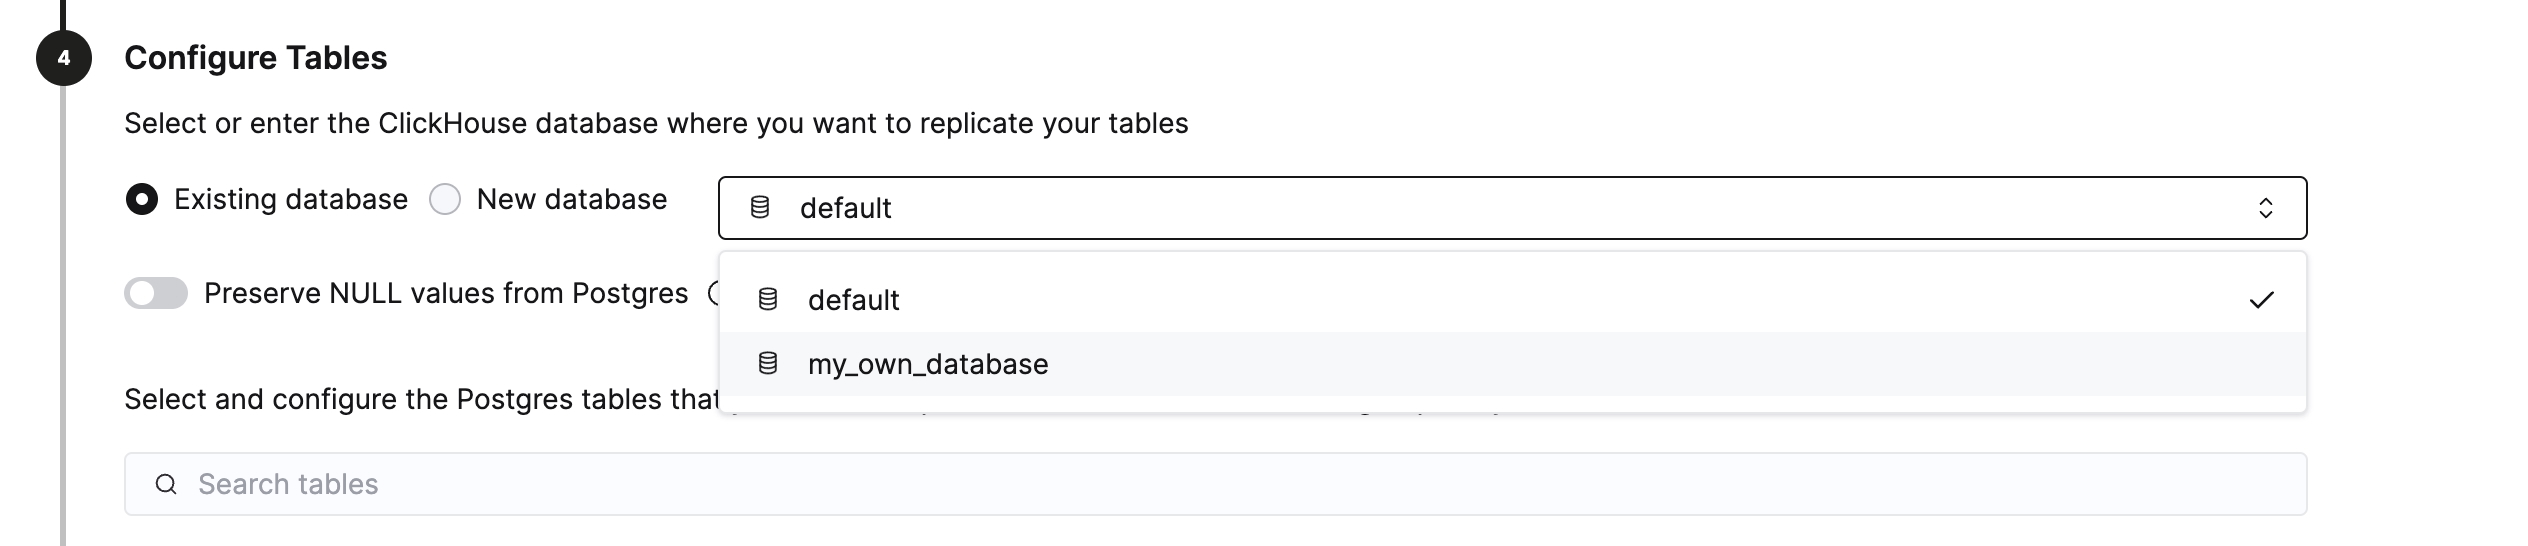
Here you can select the destination database for your ClickPipe. You can either select an existing database or create a new one.
-
You can select the tables you want to replicate from the source Postgres database. While selecting the tables, you can also choose to rename the tables in the destination ClickHouse database as well as exclude specific columns.
-
Additionally, you can provide a custom
PARTITION BY <expr>expression to control destination ClickHouse table partitioning.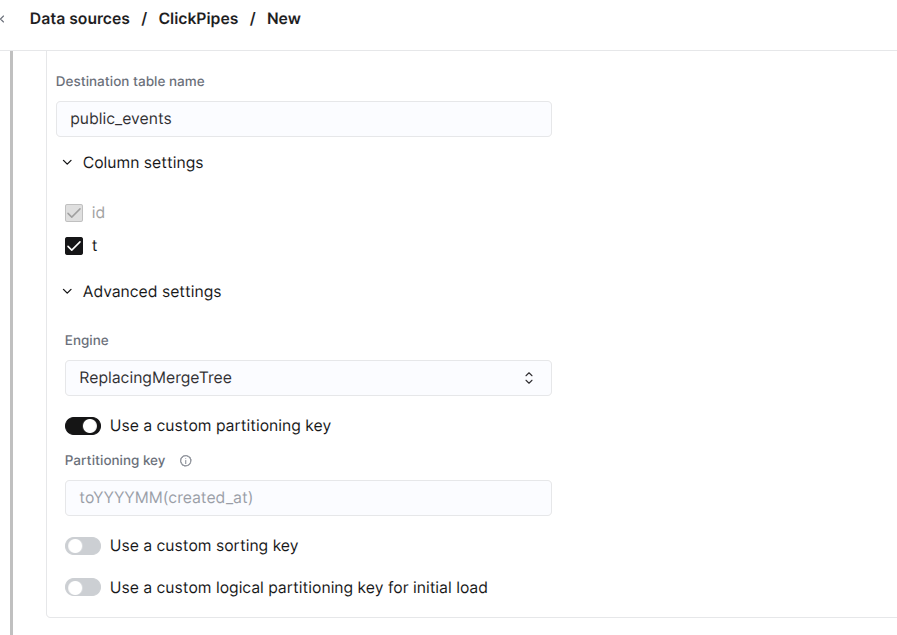
Review permissions and start the ClickPipe
-
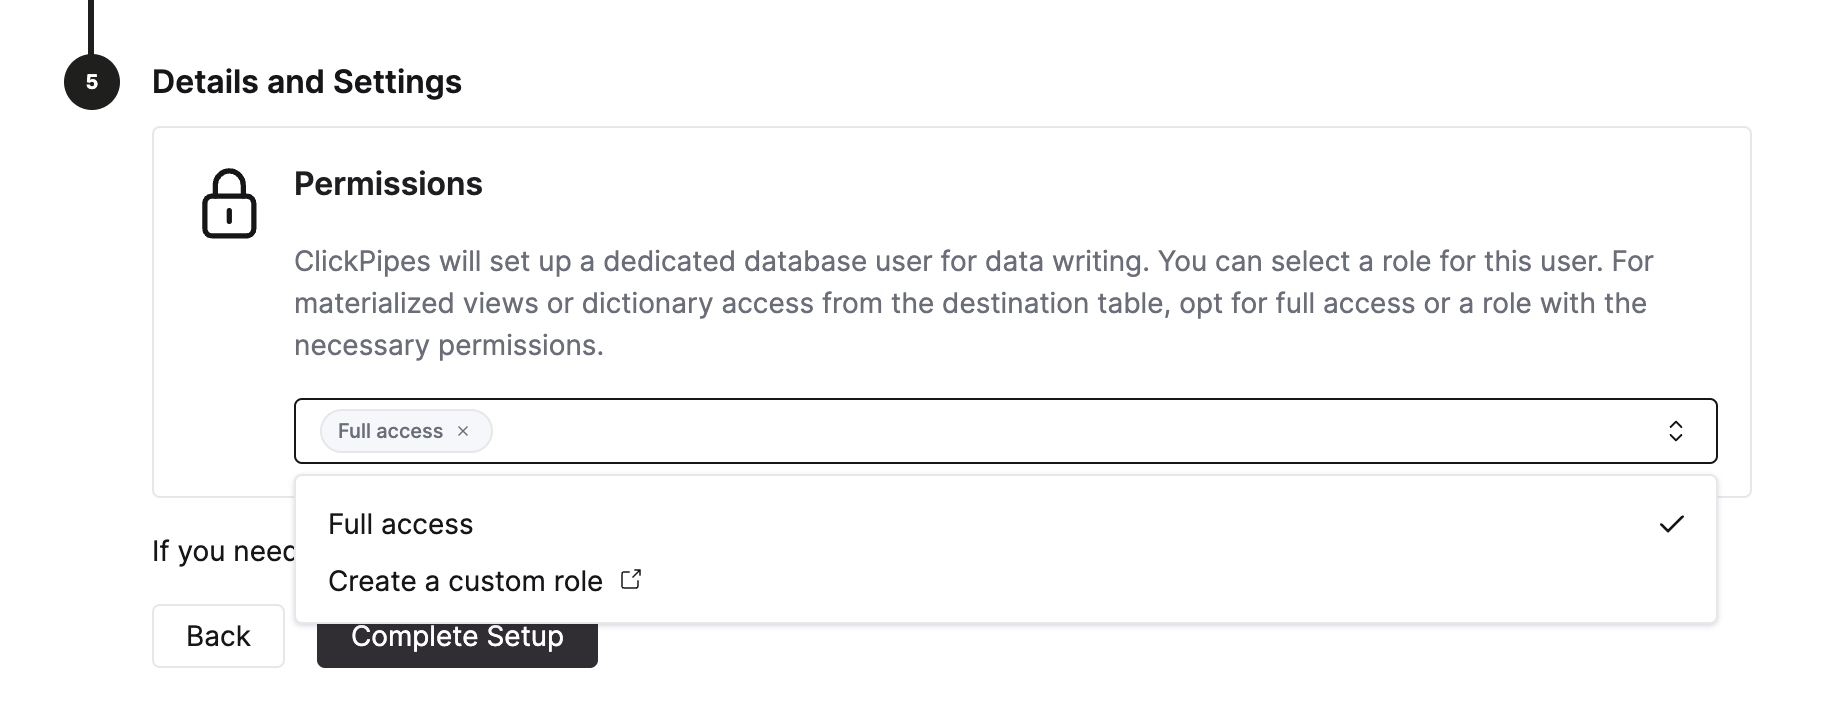
Select the “Full access” role from the permissions dropdown and click “Complete Setup”.
What’s next?
Once you’ve set up your ClickPipe to replicate data from PostgreSQL to ClickHouse Cloud, you can focus on how to query and model your data for optimal performance. See the migration guide to assess which strategy best suits your requirements, as well as the Deduplication strategies (using CDC) and Ordering Keys pages for best practices on CDC workloads.
For common questions around PostgreSQL CDC and troubleshooting, see the Postgres FAQs page.
You can follow this path yourself, script it, or hand it to an AI agent. Switch to the Cloud UI view for the console version.
This page covers creating a Postgres CDC ClickPipe, monitoring it until it is replicating, and verifying the data in ClickHouse, all from the command line with the ClickHouse CLI (clickhousectl). Commands are non-interactive; clickhousectl emits JSON with --json.
Prerequisites
Install the ClickHouse CLI:
curl https://clickhouse.com/cli | shYou also need jq, and psql for the verification step.
Write operations (create, delete) require API key authentication; OAuth login is read-only:
clickhousectl cloud auth login --api-key <YOUR_KEY> --api-secret <YOUR_SECRET>Alternatively, set the CLICKHOUSE_CLOUD_API_KEY and CLICKHOUSE_CLOUD_API_SECRET environment variables. Verify with clickhousectl cloud auth status; expect an entry with scope read/write.
Your source Postgres database must be prepared for CDC first: logical replication enabled, a replication user, and the ClickPipes IP addresses allowed through your firewall. Follow the setup guide for your provider — for example Amazon RDS, Supabase, Neon, or the generic Postgres source guide for self-hosted and other providers. Connect to the actual Postgres host: proxies and poolers such as PgBouncer, RDS Proxy, and Supabase Pooler aren’t supported for CDC.
You also need a running destination ClickHouse Cloud service. Grab its ID from clickhousectl cloud service list --json, or create one first following the Cloud quick start:
CH_ID=$(clickhousectl cloud service list --json \
  | jq -r '.[] | select(.name=="my-service") | .id')
Collect the source connection details from the prerequisites step into variables. This walkthrough replicates a single table, public.orders — substitute this name, and every later reference to it (including the column names in the verification steps), with your own table:
PG_HOST=postgres.example.com
PG_PORT=5432
PG_DATABASE=postgres
PG_USERNAME=clickpipes_user
PG_PASSWORD='<your-password>'
Create the ClickPipe
Create the pipe on the destination service and save the response:
clickhousectl cloud clickpipe create postgres "$CH_ID" \
  --name orders-sync \
  --host "$PG_HOST" \
  --port "$PG_PORT" \
  --pg-database "$PG_DATABASE" \
  --username "$PG_USERNAME" \
  --password "$PG_PASSWORD" \
  --table-mapping public.orders:orders \
  --json > pipe.json

PIPE_ID=$(jq -r .id pipe.json)
The command validates the connection to the source before creating the pipe, so connectivity, credential, and TLS problems surface immediately as a BAD_REQUEST error. The response echoes the pipe configuration (trimmed here; the full response includes every replication setting):
{
  "id": "e3d9a1f4-7b2c-4c58-9f6a-0d8b4e2c7a19",
  "name": "orders-sync",
  "serviceId": "7a1c04e2-9b3f-4a86-b21d-6f3e9d5c8a41",
  "state": "Provisioning",
  "destination": {
    "database": "default"
  },
  "source": {
    "postgres": {
      "host": "postgres.example.com",
      "port": 5432,
      "database": "postgres",
      "type": "postgres",
      "settings": {
        "replicationMode": "cdc",
        "syncIntervalSeconds": 60,
        "pullBatchSize": 100000,
        "initialLoadParallelism": 4
      },
      "tableMappings": [
        {
          "sourceSchemaName": "public",
          "sourceTable": "orders",
          "targetTable": "orders",
          "tableEngine": "MergeTree"
        }
      ]
    }
  }
}
Notes:
- One of
--table-mappingor--table-mapping-jsonis required.--table-mappingis repeatable, oneschema.table:target_tableper source table, and leaves every other per-table option at its default. The replicated tables land in thedefaultdatabase on the ClickHouse service, named by the mapping targets — mapping to a different target name is how you rename a table during replication - One command serves the whole Postgres family: pass
--postgres-typefor a managed provider (supabase,neon,alloydb,planetscale,rdspostgres,aurorapostgres,cloudsqlpostgres,azurepostgres,crunchybridge,tigerdata); the default ispostgres - The publication and replication slot are created automatically, with the publication scoped to the mapped tables. Pass
--publication-nameto use a publication you created yourself in the prerequisites step --replication-slot-namereuses a slot you created yourself, and is only accepted together with--replication-mode cdc_only--replication-modeselectscdc(initial snapshot plus continuous replication, the default),snapshot(one-time copy), orcdc_only(skip the initial snapshot)
Shaping the destination tables
--table-mapping only renames. For the per-table options that shape the destination table, pass the mapping as a JSON object with --table-mapping-json, which takes the API’s table mapping object verbatim. sourceSchemaName, sourceTable, and targetTable are required; excludedColumns, sortingKeys, useCustomSortingKey, partitionByExpr, partitionKey, and tableEngine are optional. Both flags are repeatable and can be combined in one command:
clickhousectl cloud clickpipe create postgres "$CH_ID" \
  --name orders-sync \
  --host "$PG_HOST" \
  --port "$PG_PORT" \
  --pg-database "$PG_DATABASE" \
  --username "$PG_USERNAME" \
  --password "$PG_PASSWORD" \
  --table-mapping public.orders:orders \
  --table-mapping-json '{"sourceSchemaName":"public","sourceTable":"customers","targetTable":"customers","excludedColumns":["ssn"],"sortingKeys":["created_at","customer_id"]}' \
  --sync-interval-seconds 30 \
  --json
That mapping keeps ssn out of the destination entirely and orders customers by (created_at, customer_id) instead of the source primary key:
clickhousectl cloud service query --id "$CH_ID" \
  --query "SHOW CREATE TABLE customers" --format TSVRaw
CREATE TABLE default.customers
(
`customer_id` Int32,
`name` String,
`created_at` DateTime64(6),
`_peerdb_synced_at` DateTime64(9) DEFAULT now64(),
`_peerdb_is_deleted` UInt8,
`_peerdb_version` UInt64
)
ENGINE = SharedMergeTree('/clickhouse/tables/{uuid}/{shard}', '{replica}')
PRIMARY KEY (created_at, customer_id)
ORDER BY (created_at, customer_id)
SETTINGS index_granularity = 8192Notes:
useCustomSortingKeyis set for you whensortingKeysis given, because the API ignores the keys without it. Unknown fields are rejected client-side with exit code 2 rather than silently dropped, so a typo likeexcludeColumnsfails instead of being ignoredpartitionKeypartitions the initial snapshot for parallelism and is unrelated to the destination table’sPARTITION BY, which ispartitionByExprtableEngineisMergeTree(the default, and what the simple form sends),ReplacingMergeTree, orNull
CDC settings
The replication settings are create-time flags: --sync-interval-seconds, --pull-batch-size, --initial-load-parallelism, --snapshot-rows-per-partition, --snapshot-parallel-tables, --allow-nullable-columns, --enable-failover-slots, and --delete-on-merge. Only syncIntervalSeconds and pullBatchSize can be changed once the pipe exists; the snapshot and initial-load settings are fixed at creation, so choose them now.
A Postgres CDC pipe keeps its settings on the pipe itself, so read them back with clickpipe get:
clickhousectl cloud clickpipe get "$CH_ID" "$PIPE_ID" --json \
  | jq .source.postgres.settings
{
"allowNullableColumns": false,
"deleteOnMerge": false,
"enableFailoverSlots": false,
"initialLoadParallelism": 4,
"publicationName": "",
"pullBatchSize": 100000,
"replicationMode": "cdc",
"replicationSlotName": "",
"snapshotNumRowsPerPartition": 100000,
"snapshotNumberOfParallelTables": 1,
"syncIntervalSeconds": 30
}clickhousectl cloud clickpipe settings get is a different endpoint that covers ingestion settings for streaming and object-storage pipes only. Against a Postgres pipe it exits 1 and points you back to clickpipe get.
Destination permissions
ClickPipes writes to the service as its own user. By default that user gets the full-access default_role; --role <role-name> (repeatable) selects other existing ClickHouse roles instead, the CLI equivalent of the console’s permission-role step. The roles you name replace default_role, so between them they must grant everything the pipe does — creating and writing the destination tables. A read-only role fails the create outright:
Error: BAD_REQUEST: ClickHouse validation failed: failed to create validation table peerdb_validation_tOgS: code: 497, message: clickpipe:...: Not enough privileges. To execute this query, it's necessary to have the grant CREATE TABLE ON default.peerdb_validation_tOgSThe names clickpipes and clickpipes_system are reserved and rejected client-side.
Source TLS and certificate authorities
TLS and certificate verification are enabled by default, and a source whose certificate chain is publicly trusted needs no extra flags. If the source presents a certificate signed by a CA that isn’t publicly trusted — which includes ClickHouse Managed Postgres — the connection check fails before the pipe is created, and the error names the flag that fixes it:
Error: BAD_REQUEST: failed to establish connection: failed to connect to `user=postgres database=postgres`: 203.0.113.10:5432 (postgres.example.com): failed to write startup message: write failed: tls: failed to verify certificate: x509: certificate signed by unknown authority

Hint: The source certificate chain is not publicly trusted. For a private or self-signed source CA, pass its PEM CA bundle with `--ca-certificate <PATH>`.
Pass the source CA bundle in PEM form with --ca-certificate. For ClickHouse Managed Postgres, clickhousectl fetches the bundle for you:
clickhousectl cloud postgres certs get <postgres-service-id> --output pg-ca.pemThen re-run the create command with --ca-certificate pg-ca.pem added.
If instead the certificate is valid but issued for a different name than the one you connect to, the error carries a different hint, pointing at --tls-host <hostname> to set the hostname that certificate verification should use.
Wait for the pipe to reach Running
The pipe moves through Provisioning, Setup, and (for larger tables) Snapshot before reaching Running; expect several minutes for the first pipe on a service. Failed and InternalError are terminal:
while :; do
  STATE=$(clickhousectl cloud clickpipe get "$CH_ID" "$PIPE_ID" --json | jq -r .state)
  case "$STATE" in
    Running) break ;;
    Failed|InternalError) echo "ClickPipe entered terminal state: $STATE" >&2; exit 1 ;;
  esac
  sleep 15
done
Check the pipe status
clickpipe list shows every pipe on the service; clickpipe get returns one pipe with its full configuration:
clickhousectl cloud clickpipe list "$CH_ID" --json \
  | jq -r '.[] | [.id, .name, .state] | @tsv'
e3d9a1f4-7b2c-4c58-9f6a-0d8b4e2c7a19 orders-sync RunningVerify the data in ClickHouse
Query the destination service directly from the CLI. The first call provisions a Query API endpoint and a service-scoped API key automatically:
clickhousectl cloud service query --id "$CH_ID" \
  --query "SELECT order_id, customer, amount FROM orders ORDER BY order_id" --json
Provisioning Query API endpoint + key for service 'my-service'...
{"order_id":1,"customer":"Alice","amount":42.5}
{"order_id":2,"customer":"Bob","amount":17.99}
{"order_id":3,"customer":"Charlie","amount":99}
{"order_id":4,"customer":"Diana","amount":5.25}
{"order_id":5,"customer":"Eve","amount":250}Changes on the source replicate continuously at the sync interval — 60 seconds by default, or whatever --sync-interval-seconds was set to at create time. Insert a row on the source and poll until it arrives:
Pass the password via PGPASSWORD rather than a connection URI, so special characters in it need no escaping:
PGPASSWORD="$PG_PASSWORD" psql -h "$PG_HOST" -p "$PG_PORT" -U "$PG_USERNAME" -d "$PG_DATABASE" \
  -c "INSERT INTO orders (customer, amount) VALUES ('Frank', 12.34);"

while [ "$(clickhousectl cloud service query --id "$CH_ID" \
  --query "SELECT count() FROM orders" --format TSV)" != "6" ]; do
  sleep 10
done
Manage the pipe
The pipe lifecycle is managed with clickhousectl cloud clickpipe stop, clickhousectl cloud clickpipe start, and clickhousectl cloud clickpipe resync (drops and re-snapshots the destination tables), each taking the same "$CH_ID" "$PIPE_ID" arguments. If the source is only reachable over private networking, clickhousectl cloud clickpipe reverse-private-endpoint manages the AWS PrivateLink or Google Private Service Connect endpoint; pass one of the DNS names it reports as --host when you create the pipe. SSH-tunneled Postgres sources are currently UI-only: the CLI supports direct connections and reverse private endpoints, but cannot configure SSH tunneling. See clickhousectl cloud clickpipe --help for the full list of subcommands.
Cleanup
Deleting the pipe stops replication:
clickhousectl cloud clickpipe delete "$CH_ID" "$PIPE_ID"{"deleted":"e3d9a1f4-7b2c-4c58-9f6a-0d8b4e2c7a19"}What’s next
See the migration guide to assess which strategy best suits your requirements, as well as the Deduplication strategies (using CDC) and Ordering Keys pages for best practices on CDC workloads. For common questions around PostgreSQL CDC and troubleshooting, see the Postgres FAQs page.