

 Set up docs MCP
Amazon Glue is a fully managed, serverless data integration service provided by Amazon Web Services (AWS). It simplifies the process of discovering, preparing, and transforming data for analytics, machine learning, and application development.
Installation
To integrate your Glue code with ClickHouse, you can use our official Spark connector in Glue via one of the following:
- Installing the ClickHouse Glue connector from the AWS Marketplace (recommended).
- Manually adding the Spark Connector’s jars to your Glue job.
Subscribe to the Connector
To access the connector in your account, subscribe to the ClickHouse AWS Glue Connector from AWS Marketplace.
Grant Required Permissions
Ensure your Glue job’s IAM role has the necessary permissions, as described in the minimum privileges guide.
Activate the Connector & Create a Connection
After subscribing, select the Glue version that matches your job requirements. In the Additional details section, under Usage instructions, click the link to Open Glue Studio - Add ClickHouse connector. This opens the Glue connection creation page with key fields pre-filled. Give the connection a name and press create (no need to provide the ClickHouse connection details at this stage).

Use in Glue Job
In your Glue job, select the Job details tab, and expend the Advanced properties window. Under the Connections section, select the connection you just created. The connector automatically injects the required JARs into the job runtime.
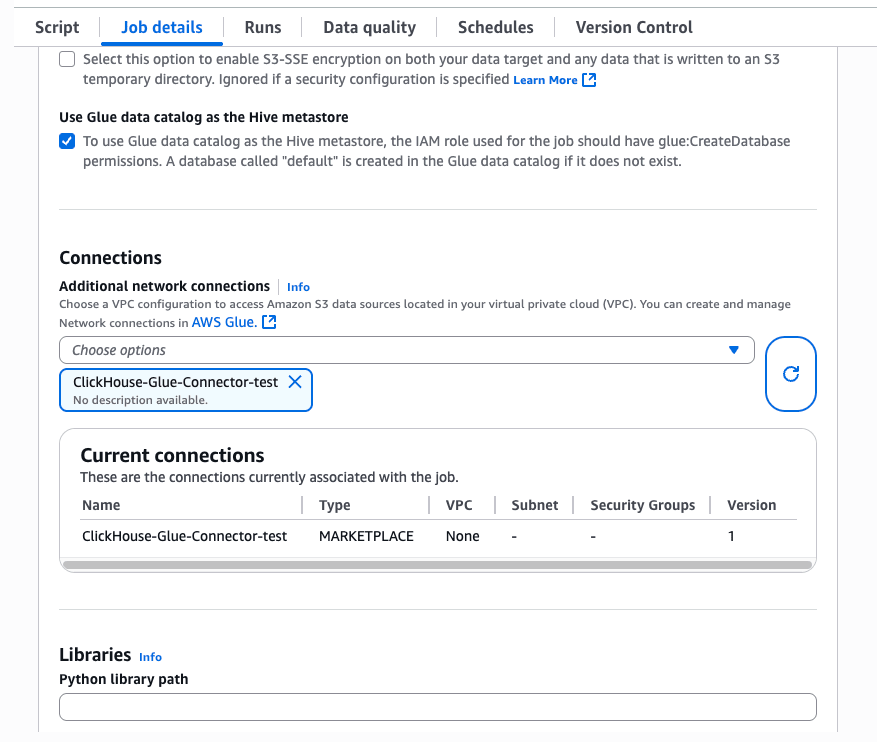
To add the required jars manually, please follow the following:
Upload the connector JAR
Upload the latest Spark connector JAR (clickhouse-spark-runtime-3.X_2.X-0.10.X.jar) to an S3 bucket.
Grant access to the S3 bucket
Make sure the Glue job has access to this bucket.
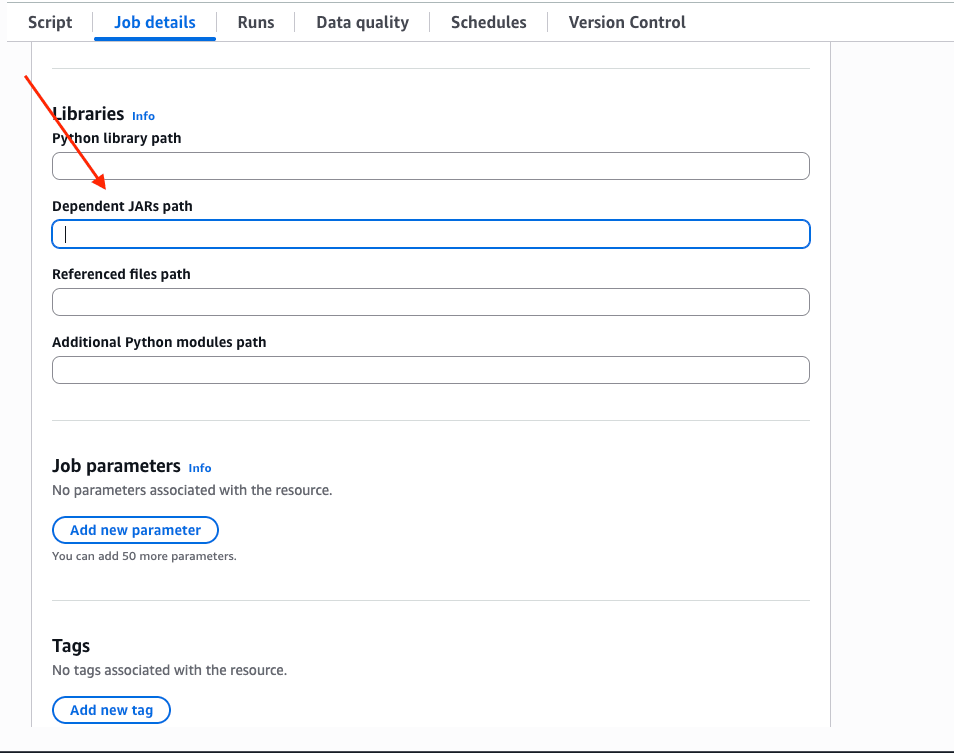
Configure the dependent JAR path
Under the Job details tab, scroll down and expend the Advanced properties drop down, and fill the jars path in Dependent JARs path:
Using AWS Secrets Manager for credentials
Rather than hardcoding your ClickHouse user and password in the job, store them in AWS Secrets Manager and reference the secret from your Glue connection or job script. At runtime, Glue fetches the secret and merges its key-value pairs into the connector’s connection options.
Create the secret
In AWS Secrets Manager, create a secret of type Other type of secret with key-value pairs whose keys match the connector’s option names:
| Key | Value |
|---|---|
user |
your ClickHouse username |
password |
your ClickHouse password |
Any key you put in the secret is forwarded to the connector, so you can also store host, database, or any other option there if you’d like to keep them out of code.
Reference the secret
There are two ways to wire the secret into a job.
Option 1: attach it to the Glue connection. When creating or editing the ClickHouse connection in Glue Studio, set the AWS secret field to the secret’s name. Any job that uses this connection resolves the secret automatically — no code changes needed.
Option 2: pass secretId in connection options. Use this when the secret isn’t attached to the connection. Add secretId alongside connectionName:
source = glueContext.create_dynamic_frame.from_options(
    connection_type="marketplace.spark",
    connection_options={
        "connectionName": "<your-connection-name>",
        "secretId": "clickhouse/glue/credentials",
        "database": "default",
        "table": "example_table"
    },
    transformation_ctx="clickhouse_source"
)
val source = glueContext.getSource(
connectionType = "marketplace.spark",
connectionOptions = JsonOptions(Map(
"connectionName" -> "<your-connection-name>",
"secretId" -> "clickhouse/glue/credentials",
"database" -> "default",
"table" -> "example_table"
)),
transformationContext = "clickhouseSource"
)The secret’s user and password keys are merged into the connector options at runtime, so you never need to read them in your script.
Examples
The examples below use marketplace.spark and reference the connector by connectionName. If you installed the connector manually (Manual Installation tab), use connection_type="custom.spark" and pass className, host, http_port, user, and password directly in the options instead.
If you attached an AWS secret to the connection itself (Option 1 in Using AWS Secrets Manager for credentials), drop secretId from the options — Glue resolves credentials from the connection automatically.
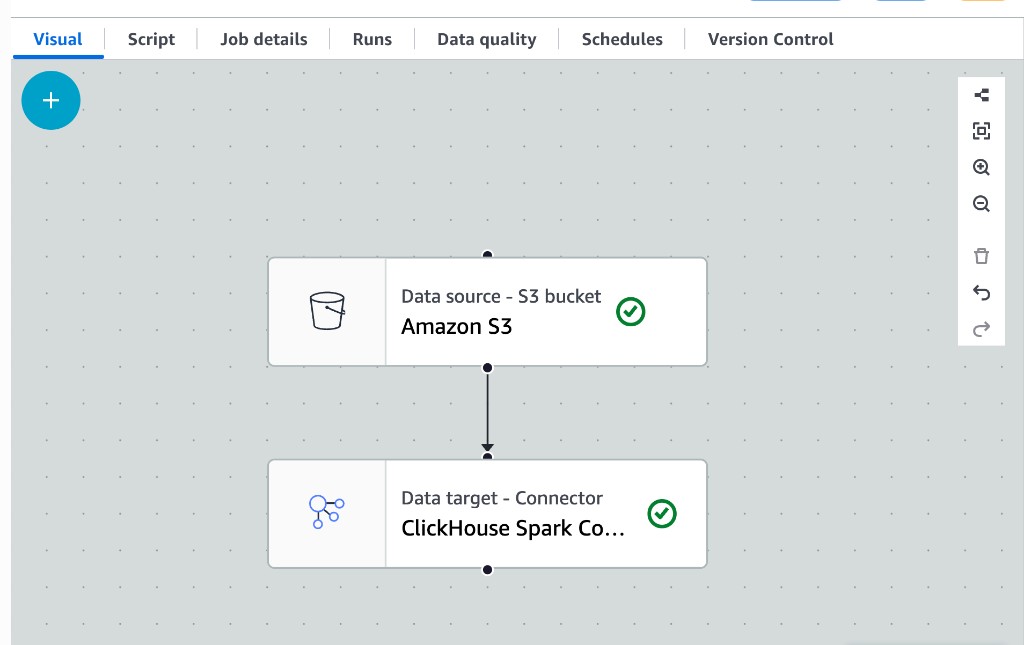
You can use the ClickHouse connector as either a source or a target in the Glue Studio visual editor. Simply drag the ClickHouse Spark Connector component onto the canvas and connect it to your data pipeline.
import com.amazonaws.services.glue.GlueContext
import com.amazonaws.services.glue.util.{GlueArgParser, Job, JsonOptions}
import org.apache.spark.SparkContext
import scala.collection.JavaConverters._

object ClickHouseGlueExample {
  def main(sysArgs: Array[String]): Unit = {
    val args = GlueArgParser.getResolvedOptions(sysArgs, Seq("JOB_NAME").toArray)

    val sc = new SparkContext()
    val glueContext = new GlueContext(sc)
    Job.init(args("JOB_NAME"), glueContext, args.asJava)

    val readOptions = JsonOptions(Map(
      "connectionName" -> "<your-connection-name>",
      "secretId" -> "clickhouse/glue/credentials",
      "database" -> "default",
      "table" -> "example_table"
    ))

    val source = glueContext.getSource(
      connectionType = "marketplace.spark",
      connectionOptions = readOptions,
      transformationContext = "clickhouseSource"
    )
    val dyf = source.getDynamicFrame()

    val writeOptions = JsonOptions(Map(
      "connectionName" -> "<your-connection-name>",
      "secretId" -> "clickhouse/glue/credentials",
      "database" -> "default",
      "table" -> "target_table"
    ))

    glueContext.getSink(
      connectionType = "marketplace.spark",
      connectionOptions = writeOptions
    ).writeDynamicFrame(dyf)

    Job.commit()
  }
}
import sys
from awsglue.utils import getResolvedOptions
from pyspark.context import SparkContext
from awsglue.context import GlueContext
from awsglue.job import Job
args = getResolvedOptions(sys.argv, ['JOB_NAME'])
sc = SparkContext()
glueContext = GlueContext(sc)
logger = glueContext.get_logger()
job = Job(glueContext)
job.init(args['JOB_NAME'], args)
read_options = {
"connectionName": "<your-connection-name>",
"secretId": "clickhouse/glue/credentials",
"database": "default",
"table": "example_table"
}
source = glueContext.create_dynamic_frame.from_options(
connection_type="marketplace.spark",
connection_options=read_options,
transformation_ctx="clickhouse_source"
)
dyf = source
logger.info(f"Read {dyf.count()} rows from ClickHouse")
write_options = {
"connectionName": "<your-connection-name>",
"secretId": "clickhouse/glue/credentials",
"database": "default",
"table": "target_table"
}
glueContext.write_dynamic_frame.from_options(
frame=dyf,
connection_type="marketplace.spark",
connection_options=write_options,
transformation_ctx="clickhouse_sink"
)
job.commit()For more details, please visit our Spark documentation.